HallPulse Help Center
Complete Classroom Edition Setup and User Manual
Set up your classroom, open the student kiosk, and review hall pass activity. Begin on the computer and browser profile you plan to use for your teacher dashboard. This is your primary device.
Need a classroom license? Get HallPulse Classroom Edition on Teachers Pay Teachers ($10 USD, one-time purchase).
Activate your classroom
Step 1. Open HallPulse in Chrome or Edge while connected to the internet. Select Set up my classroom at https://app.hall-pulse.com/.
Step 2. Enter the product access code provided with your HallPulse Classroom Edition purchase on Teachers Pay Teachers into the Product access code field, then select Continue.
Enter Your Access Code
Step 3. Choose a Username and a Local passphrase of at least 12 characters. Confirm the passphrase and select Create my classroom. Keep the passphrase somewhere secure. You will use it to unlock this browser after a restart or classroom lock.
Step 4. On Protect your recovery, choose Download a new recovery kit. Save the file outside the browser, check the box to confirm you saved it, and select Activate this recovery kit. To continue immediately, choose Finish recovery setup later.
When you return, open the same web address in the same browser profile. On Unlock HallPulse, enter your local passphrase and select Unlock classroom. Classroom registration uses your chosen username.
Set up classes and rosters
After activation, the setup wizard takes you through Teacher, Security, Classes, Rosters, and Finish. You can add more classes and students from the dashboard later.
Step 1. Teacher. Enter your school name, verify the time zone, and choose how students’ names will appear. Select Continue.
Step 2. Security. Set and confirm a Kiosk PIN of 4 to 8 digits. Use it to open teacher controls from the primary kiosk and approve eligible immediate departures. Check Allow one student out at a time for all destinations if you want a shared waiting list.
Step 3. Classes. Enter the class name, period, days, and start and end times. Add other classes as needed. HallPulse uses this schedule to show the right roster as the day progresses.
Step 4. Rosters. Select a class tab and add its students individually or import a list. Repeat for each class, then select Finish setup and Open the teacher dashboard.
Import a list of student names
Use one student name per line in a Word .docx or plain text .txt file. A CSV can include optional student numbers. From Google Docs, use File → Download → Microsoft Word (.docx) or copy and paste the names.
During setup, use Choose file, check the preview, and select Add listed students. After setup, go to Students → Import student list, choose the class roster, then upload or paste the list. Review the names before selecting Add students. HallPulse reads these files on your device.
Set your schedule and check the active class
For an A/B schedule, choose the class schedule type in Classes. In Schedule, set a known rotation date and whether it was A or B. Add school closures and date overrides there. Check the schedule preview before using the kiosk.
For a temporary change, open Classes → Manual class control and select Show beside the class name. Select End manual override to return to the schedule. The override also ends at the end of the day.
Use the student kiosk
On the primary device, select Student Kiosk → Open student kiosk on this device. The kiosk displays the active class and its roster. If you want the teacher dashboard available on a separate screen, pair a second device using the second-device pairing instructions.
Show students how to leave and return
Step 1. Request a pass. Tap your name or display number and choose your destination. If the waiting list is on and someone is already out, stay in class and watch your position.
Step 2. Wait for your turn. When the students who are out return, HallPulse signs out the next eligible student automatically. Leave when your name appears in Out now. If you no longer need to leave, use Leave queue beside your waiting entry.
Step 3. Sign back in. When you return, tap your name or number in Out now. HallPulse records your return immediately.
Approve an immediate departure
With the queue enabled, Office, Counselor, and Other also offer Leave now · teacher PIN. The teacher selects this option for the destination, enters their PIN, and chooses Approve and leave now. The student can leave immediately. Other students keep their places in line.
Change what students see
Under Student Kiosk, use Kiosk display to choose names or display numbers and adjust the name style. Use Destination categories to edit the choices and Student sign-out queue to change the waiting-list setting. Turning off the queue clears the waiting list and keeps existing open passes.
Return to teacher controls
On the primary kiosk, select Teacher Dashboard, enter your Kiosk PIN, and select Unlock the dashboard. Select Lock classroom when you want to protect the teacher dashboard. After a lock, use your local passphrase to reopen it.
Try it before the first class
During an active class, try the queue with two fictional students. Sign one out, have the second request a pass, and tap the first student’s name to return. Check that the second student moves into Out now and that Departure history shows the completed visit.
Pair and manage a second kiosk
A secondary kiosk handles student taps while you use the teacher dashboard on your primary device. Pair one secondary at a time. Have both devices online and the primary classroom unlocked during setup.
Connect the second device
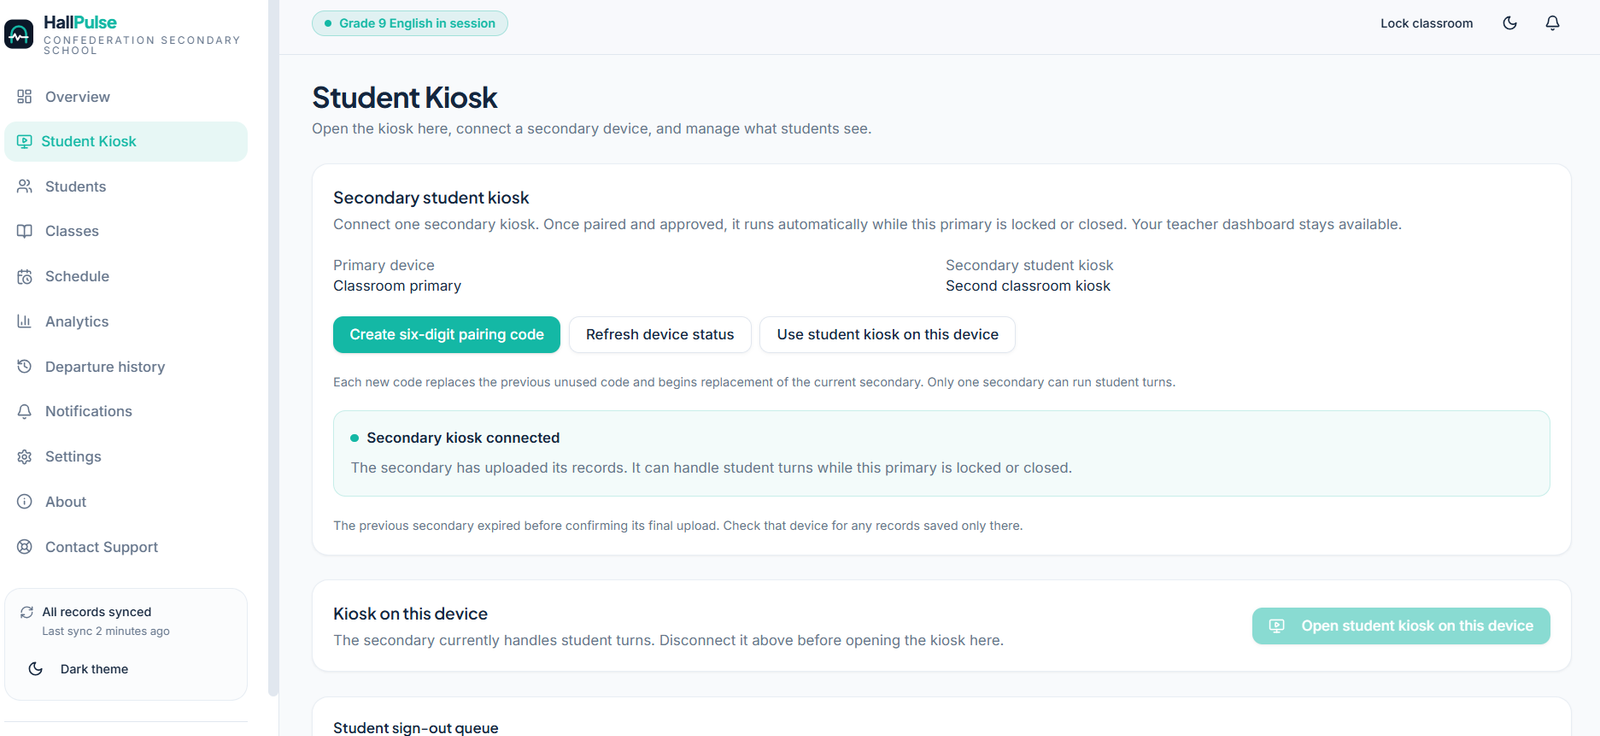
Step 1. On the primary, open Student Kiosk → Secondary student kiosk and select Create six-digit pairing code. The code expires after five minutes.
Step 2. On the secondary, open the kiosk connection page. Enter a recognizable Kiosk name and the Six-digit pairing code, then select Request connection.
Step 3. On the primary, wait for the approval prompt. Compare the fingerprint shown on both screens. Check The fingerprint matches the kiosk I want to connect and select Approve this kiosk.
Step 4. Wait for the secondary to show that the kiosk records are securely saved and the primary may stay closed. Verify the active class and roster before students use it.
Secondary kiosk connection page: https://app.hall-pulse.com/connect
Keep the roster and history current
The secondary can run while the primary is locked or closed. Periodically reopen the primary online and unlock it so it can import the secondary’s history and send classroom changes. Updates to the secondary take effect after its current turns finish.
Disconnect or replace a kiosk
To return kiosk control to the primary, select Use student kiosk on this device in the secondary kiosk section. Keep both devices online and let students who are out sign back in. Wait for the final records to synchronize, then open the kiosk on the primary.
If the old device is unavailable, select End kiosk now without syncing, review the confirmation, and select End kiosk now. Records already on the primary are kept. Records still waiting to be imported may be lost. Stop using the old device, which can continue to show a cached screen while offline.
To pair a replacement, create a new six-digit code and repeat the pairing steps. When the old kiosk is still available, finish its safe handoff before approving the replacement.
Review history and reports
Check who is out
Open Overview to see Currently out and recent departure activity. Use the class and date filters to focus on the group or period you need. If you use a secondary kiosk, reopen and unlock the primary online to bring its history up to date.
Find and correct a departure
Step 1. Open Departure history and filter by class, student, destination, status, or date range. You can also search by name.
Step 2. Select Correct beside the record. Use Confirm the return time when you know the actual time. If you cannot verify the return, use Mark as unresolved.
Step 3. Add a teacher note if useful and select Save correction. Open Notifications to review unconfirmed returns and other items that need attention.
When the class ends with a pass still open, HallPulse closes the record with the return unconfirmed. Averages use confirmed returns so an automatic closeout does not inflate the time a student was out.
Export a report
Step 1. Open Analytics and choose the date range and classes to include.
Step 2. Review the charts and class comparison, then select Export PDF. Open the downloaded report to print or share it.
For individual departure rows, use the CSV export in Departure history. For encrypted copies of the classroom, use Settings → Backups and exports. Downloaded reports can contain student information. Store and share them according to your school’s procedures.
Read classroom observations
Analytics shows departure counts, destinations, time out, and patterns by period. Use those figures to identify when to look more closely at individual records. If you enable optional AI explanations, HallPulse sends approved summary numbers and categories for the explanation.
Back up your classroom
Keep an encrypted backup outside the browser. The primary stores your classroom in a local vault, so clearing site data or removing the browser profile can remove the roster, history, and device registration.
Download an encrypted backup
Step 1. Go to Settings → Backups and exports → Create encrypted backup.
Step 2. Choose a Backup passphrase of at least eight characters and select Download backup. Save the file somewhere you can access even if the primary device is unavailable. Keep its passphrase securely.
Step 3. Make a fresh backup after significant roster or schedule changes and periodically during the term. When using a secondary, let its records import to the primary before making the backup.
To restore a saved file on an accessible primary, select Restore from backup, choose the file, enter its backup passphrase, and select Restore now. This replaces the classes, roster, and history on that device. Back up the current data first if you need to keep it.
Set up and use your recovery kit
In Settings → License and recovery, select Download a new recovery kit. Save the file privately outside the browser, check the saved-file box, and select Activate this recovery kit. HallPulse restores the latest saved backup, which can be newer than the kit.
• Go online in a fresh Chrome or Edge profile and open Recover my classroom.
• Choose your latest activated kit (.json) and select Check recovery kit. Review the backup date and counts. If offered, select Finish syncing old kiosk, then Check backup again once it finishes.
• Set and confirm a new local passphrase (at least 12 characters). Confirm this browser as primary and select Restore classroom. The old devices are disconnected. Unsynced kiosk records may be missing.
Download and activate a fresh kit after recovery. Pair your secondary kiosk again if needed.
Install a shortcut and prepare for offline use
In Settings → Install HallPulse and work offline, select Install on this device when available. You can also use the Chrome or Edge install icon if your school allows it. You can continue to use HallPulse in a regular browser tab.
Open HallPulse online first so the browser can save the app for offline use. The primary can work offline for up to 24 hours after its last license check. A paired secondary can work offline for up to eight hours after its last check. Reconnect both devices and unlock the primary to synchronize saved activity.
In Settings → Cloud sync, check Waiting to sync and Last sync. Select Sync now while online to retry cloud history synchronization. Choose your record retention period in Settings → Data retention.
Troubleshoot and get support
| What you see | What to do |
|---|---|
| The access code is rejected | Check that you copied the whole code from your purchase instructions and are online. Use Use an updated product access code if you were issued a new code. Contact support if the code is still rejected. |
| The kiosk says no class is in session | Check the time zone, class days and hours, and roster assignments. For a temporary change, use Classes → Manual class control. |
| The pairing approval does not appear | Check both connections, confirm the code is current, and wait for the next five-second check. Select Refresh device status on the primary if needed. |
| Records are waiting to sync | Reconnect the secondary and reopen the primary online and unlocked. Check Settings → Cloud sync after the secondary’s history has had time to import. |
| An update or stale screen is stuck | Finish any active turns, close all HallPulse windows on that device, and reopen the app. Keep the browser’s site data so your local vault and registration remain available. |
| The primary is unavailable or locked | If it’s locked, enter your local passphrase. If the primary is unavailable, use Recover my classroom with your activated kit (recovery instructions). If you need help, contact support. |
Student privacy and classroom data
Kiosk display. Students use the kiosk without an account or email address. To show numbers in place of names, change the display setting in Student Kiosk.
Classroom storage. HallPulse encrypts rosters, school details, and teacher notes in your browser. Paired kiosk data and recovery backups are also encrypted. Keep your recovery kit private because it can open the backup.
Cloud history and AI. If enabled, cloud history uses random references in place of student names. The service can read the coded records, including times, destinations, and status. Optional written AI explanations use numeric summaries and fixed question categories.
Reports and support. Follow your school’s procedures for sharing PDF and CSV exports. HallPulse uses your username and support reference to identify your registration.
Contact HallPulse support
In the teacher dashboard, open Contact Support, choose a subject, and describe what happened. Include the exact error wording, the device, and the steps you took. Leave student names, passphrases, PINs, and recovery keys out of the message. Add a reply email if you want a response.
If you cannot open the teacher dashboard, contact HallPulse technical support using our form. Provide a reply email, but never include student names, passwords, PINs, access codes, or recovery keys.